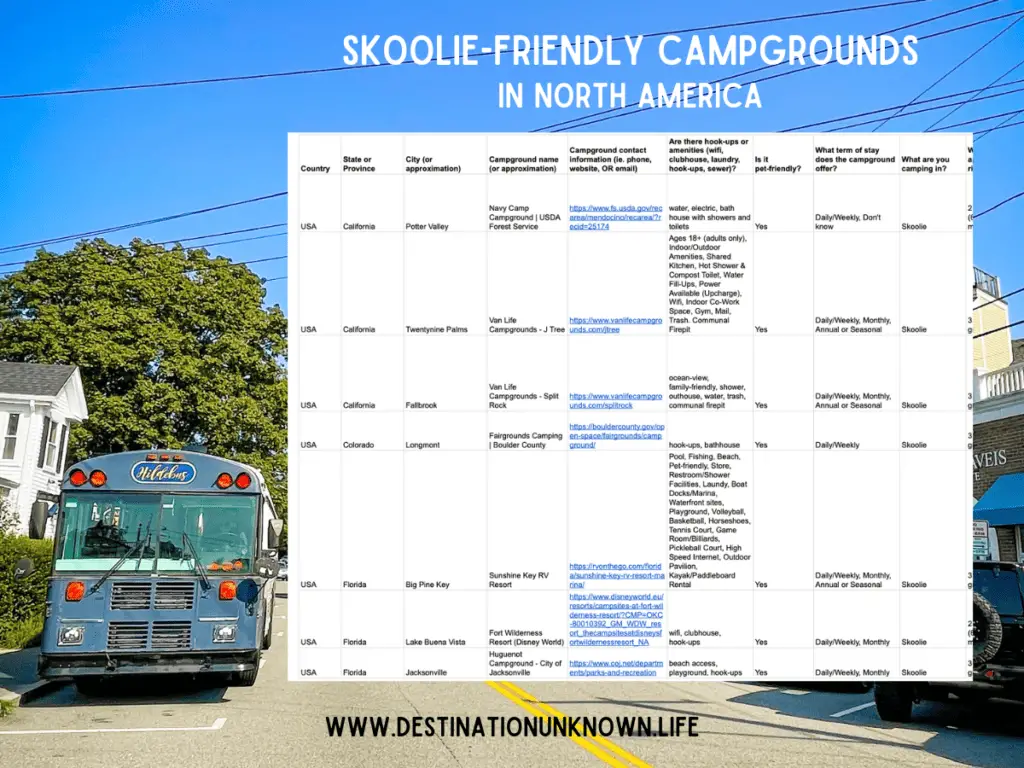
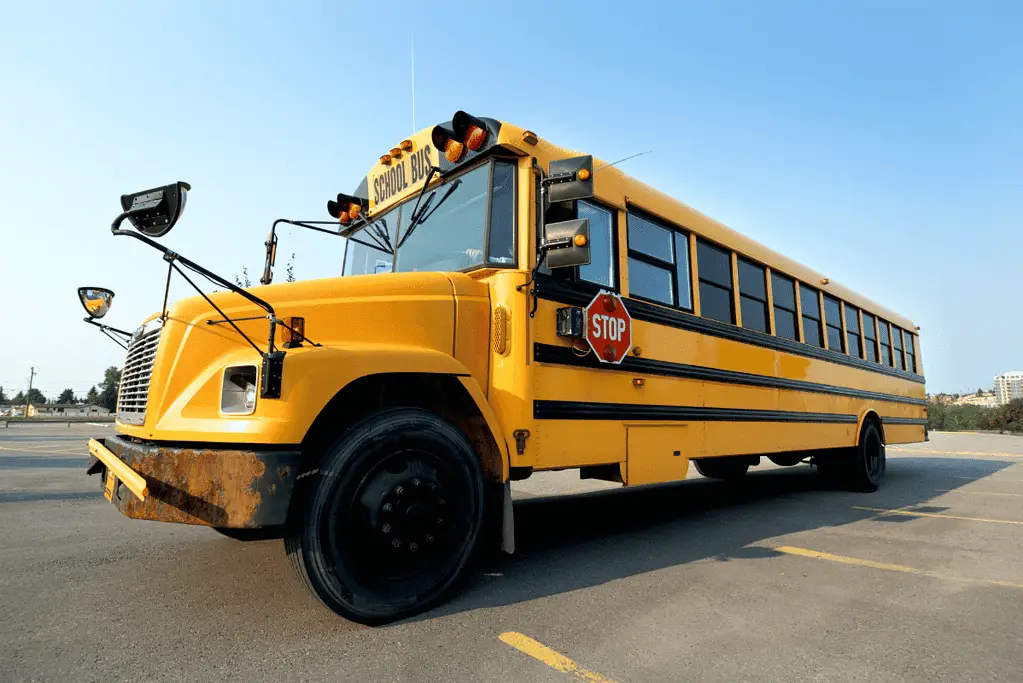
You’re not alone. A common question I see on skoolie forums from new and veteran skoolie owners is where to find skoolie-friendly campgrounds during their travels. To create this directory, I spent over ten hours scouring skoolie forums and websites for personal recommendations from the skoolie community and four months of direct outreach to campground managers in the USA and Canada. Additionally, there are helpful features like an interactive Google Map and tips for free or wild camping, including in populated areas.
Paid Download
My goal is that the Skoolie-Friendly Campground Directory will be a growing and reliable resource that provides helpful information to the school bus conversion community. We’ve got 287+ campgrounds and increasing!
Free Download
Don’t despair if you are looking for a free alternative. Check out the simpler free version of the full-version. This is actually the guide that started it all, and includes about 95+ campgrounds in the USA that allow skoolies to camp.
To add your favorite skoolie-friendly campgrounds to the list, email me at hello@destinationunknown.life with the details.
What is included in the skoolie-friendly campground directory?
The directory of skoolie-friendly campgrounds in North America reflects input from our community on which campgrounds they’ve camped at and recommend as being accepting of school bus conversions, and input from privately owned and operated campgrounds and RV park owners. Campgrounds can be found in all 50 American states and 10 Canadian provinces. Sounds pretty nice, eh?
The campgrounds include privately owned campgrounds, RV parks, RV resorts, tiny home communities, private land, and even some highly-rated public parks in the United States of America and Canada. These campgrounds require payment and are not free campgrounds; however, I include a guide at the back of the e-book that offers tips on how to free and wild camp.
The directory provides the:
State, city, name, and contact information of the campground
Answers commonly asked questions like:
Is the campground pet-friendly?
What are the campground amenities (full hook-ups like water, dog park, playground, wifi, etc)?
In order to add your campground to the directory, you’ll be presented with 12 simple questions about the campground and why you liked it.
If you have difficulty with the form, please feel free to email Ingrid instead at Hello@DestinationUnknown.Life with the information.
Skoolie-Friendly Campgrounds FAQs
Does KOA allow skoolies?
Yes. Skoolies may be allowed to park at some KOAs but not all. Each KOA-affiliated campground is privately owned and operated, meaning that each business has its own rules and regulations.
You can eliminate some of the guesswork when searching by looking in the skoolie-friendly campgrounds directory of North America. In it, you’ll find over 287+ campgrounds, RV parks, and tiny home communities that welcome skoolies.
KOA stands for Kamping of America, and it’s company that maintains affiliate listings of privately owned campgrounds in North America.
Where can I find skoolie-friendly campgrounds near me?
Locating skoolie-friendly campgrounds is becoming easier because of the number of available resources. Using the skoolie-friendly campgrounds directory of North America, you’re able to find over 287+ campgrounds, RV parks, and tiny home communities that welcome skoolies.
There are also a number of membership programs, like Harvest Hosts or Thousand Trails, where you pay an annual fee thus giving you access to to the short-term sites on their platform. Finally, you can locate thousands of free camping sites using sites like BLM lands, USDA, and much more.
Where can I find long-term skoolie parking?
Common ways to find long-term skoolie parking is by contacting RV and mobile home parks, tiny home communities, friends and family with land, and boat yards.
You can eliminate some of the guesswork when searching by looking in the skoolie-friendly campgrounds directory of North America. In it, you’ll find over 287+ campgrounds, RV parks, and tiny home communities that welcome skoolies, some of which offer long-term skoolie parking.
Can I park my skoolie in an RV resort?
Yes. Skoolies may be allowed to park at some RV resorts but not all. Each RV resort is privately owned and operated, meaning that each business has its own rules and regulations.
You can eliminate some of the guesswork when searching by looking in the skoolie-friendly campgrounds directory of North America. In it, you’ll find over 287+ campgrounds, RV parks, and tiny home communities that welcome skoolie conversions.
Yes. National parks are very skoolie-friendly camping destinations for short-term stays. With that being said, national parks often have length restrictions for bus builds so check your size on their website before booking.
Yes. State parks are very skoolie-friendly camping destinations for short-term stays. With that being said, state parks may have some restrictions to camp overnight depending on things like length and animals, so check on their website before booking.
Maybe. It depends on if the city park is equipped for overnight camping. The amenities available in city parks vary from town to town, state to state. If a city park does offer overnight camping, remember to check for restrictions on common restrictions such as length.
Conclusion to Skoolie-Friendly Campgrounds in North America
I hope that the Skoolie-Friendly Campgrounds Directory for North America gives you some peace of mind when traveling in your skoolie conversion. We have a lovely community of independent thinkers, DIYers, and travel enthusiasts who deserve to easily locate skoolie-friendly campgrounds wherever they roam.
My goal is that the directory will be a growing and reliable resource that provides helpful information to the school bus conversion community.
I hope in the near future that more campgrounds will be added to this list so that the days of hunkering down for an overnight or two in Wal-Mart parking lots and refilling your water tanks at questionable truck stops are fewer and far between… unless that’s your vibe. 🙂
To add your favorite skoolie-friendly campgrounds to the list, use this form or email me at hello@destinationunknown.life with the details.
If you are looking for more in-depth reviews of some of our favorite RV parks, peep them here:
Disclosure: Some of the links in this article may be affiliate links, which can provide compensation to me at no cost to you if you decide to purchase a paid plan. Thank you, if you do. As an Amazon Associate I earn from qualifying purchases. This site is not intended to provide financial advice and is for entertainment only. Read our affiliate disclosure in our privacy policy.
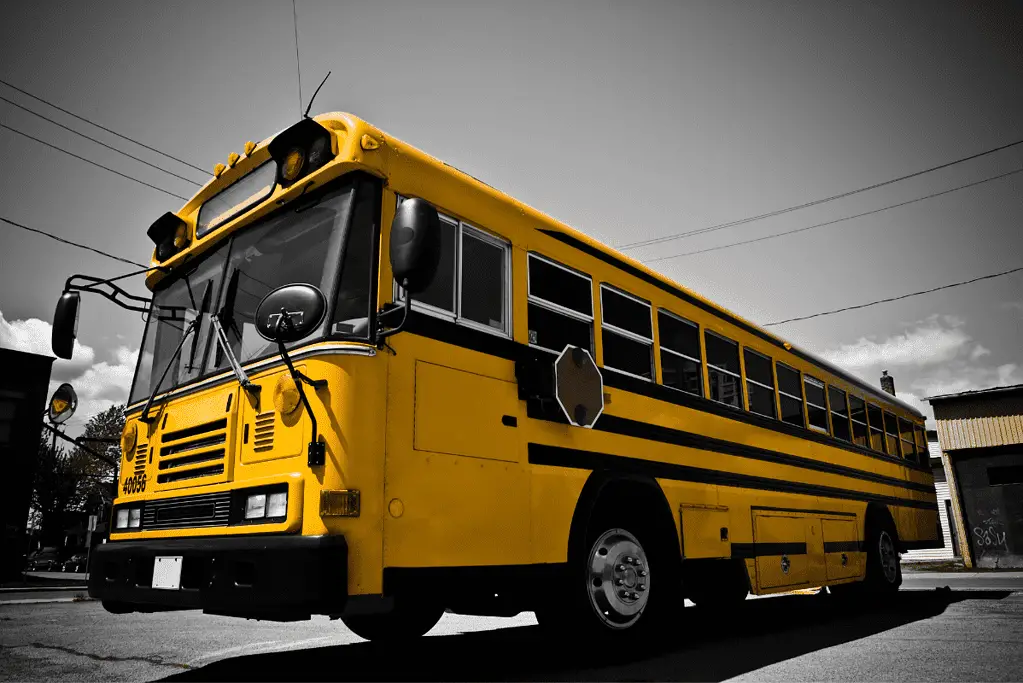
RV parks everywhere have different requirements, and some are more finicky than others. From the totally chill to the downright snobby, there is a lot of variation in what you may come across on your skoolie journey. Keep reading for the 8 shocking reasons why skoolies aren’t allowed in RV parks (Reason #6 may surprise you!).
Below, I’ve listed some of the most common reasons I have personally read or discussed with other school bus conversion owners when searching for RV campgrounds.
Much of this information is available on RV campground websites, in the “Rules and Regulations” section; however, I often recommend calling a campground in advance because websites can contain outdated information.
Table of Contents
Our Skoolie Journey and Staying in RV Campgrounds
We built our school bus conversion out over 8 months during the pandemic, then hit the road full-time with our family of five. We traveled for 6 months along the East Coast, visiting 12 states along the way.
During our adventure, we stayed in RV campgrounds in several states, and had positive experiences in all of them, despite the RV park horror stories you hear directed towards the skoolie community.
What are some reasons why skoolies aren’t allowed in RV Parks?
While the list as to why skoolies or school bus conversions may not be allowed in RV campgrounds could be endless, I’ve put together a list of the most common reasons why skoolies are denied entry to stay at an RV park.
Not a Self-Contained RV
Everyone poops. If your skoolie doesn’t have showers and plumbing for waste disposal, a campground may have concerns about how you dispose of your waste or may not have the infrastructure in place with public bathhouses (bathrooms, showers) for you to use during your stay.
Length
If you have a huge rig, like over 29 feet, then you may have difficulty finding campgrounds that can accommodate your size even if they accept alternative RVs.
The DIY nature of a school bus conversion is admittedly a concern for RV park owners and certainly a common fear of newbie skoolie-builders.
If you are building your rig yourself, I recommend spending a little extra money to have a professional electrician inspect your entire system and draft a certificate of inspection stating that it’s in working order.
Age
If your rig is over 10 years old, then some campgrounds may cite age as a reason to deny you. In those cases, it may be helpful to show a vehicle inspection showing that your rig is in tip-top shape.
Snobbery
Some campgrounds are downright snobby and won’t let you in if you don’t fit into the rest of the community. In those cases, just move along because you probably don’t want to stay there anyway.
Pet Restrictions
Traveling with pets is very common in the RV community; however, if you’re traveling with an uncommon housepet like a pot-bellied pig, then a campground may take issue with allowing farm animals on their property!
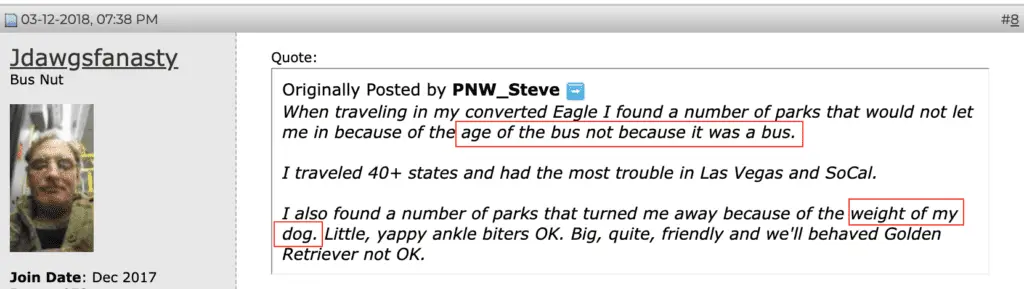
More commonly, for more traditional pets like dogs, you may find there are breed restrictions, weight or size restrictions, and vaccination requirements that could affect your pet’s ability to camp in the park.
Bad Paint Job
This is definitely a case of judging a book by its cover, but that is how the cookie crumbles sometimes. This point is closely related to the snobbery point above; however, it is a commonly cited cause I see in forums and Facebook groups as to why a skoolie is turned away from an RV resort or campground.
Membership Only Resorts
Some RV resorts offer memberships, meaning that it’s members pay fees to be apart of the community. This can result in situations like paid members having more pull in who camps in the resort, being given priority camp sites and first availability, or it affects the length of time non-members can camp.
Why Skoolies Aren’t Allowed in RV Parks FAQs
What can I do if an RV park won’t let my skoolie stay at the campground?
The best answer is to leave and find other accommodation. Unfortunately, a business can refuse service for a number of reasons, even if that reason is simply that you are driving a skoolie.
Fortunately, there are far more campgrounds out there that do accept school bus conversions and other alternative recreational vehicles, and being turned away is less common than you may think (though it doesn’t feel great when it happens to you!). Check out this list of skoolie-friendly campgrounds in North America.
Can I camp at an RV park with my dog?
Probably. Nearly all campgrounds allow dogs, but they may have breed restrictions, weight restrictions, or vaccination requirements (like an updated rabies vaccination).
The resorts aren’t checking what’s inside your vehicle; however, if you’re carrying a barnyard animal that needs walks and may surprise the neighbors, expect to have some questions.
It is common within the RV community to travel with pets, especially dogs. Dogs provide their owner with security, and support, and act as a deterrent against burglars.
How do I know if my Skoolie Will Be Allowed to Park at an RV Park?
The best way to know if your skoolie will be allowed to camp at an RV park is to review the “rules and regulations” on their company website to first see if there are any glaringly obvious disclaimers against “alternative vehicles.”
Next, you’re going to pick up the phone and call the camp office to chat one-on-one with the office manager. I have often found that what is stated on a website and what is allowed may differ, so speaking with a real person will save you hours of headaches. You can also offer to text or email a photo of your rig and any supporting documents to help, if additional support is needed.
Can I park my Skoolie at a National Park?
Yes, the National Parks in the United States don’t care if you drive a skoolie. The national parks have length restrictions, so you may not be eligible to park if your bus exceeds the requirements.
Unfortunately, length restrictions are one of the most common reasons why skoolies aren’t allowed in RV parks.
Are There Free, Skoolie-Friendly RV Campgrounds?
Yes. Some of our best memories in our skoolie were spent at free campgrounds or staying with friends and family. One of the easiest ways to find free campgrounds that are skoolie-friendly are through platforms like Harvest Hosts and Boondockers Welcome and on BLM-managed land. BLM stands for the Bureau of Land Management of the United States of America.
The best part of these free, skoolie-friendly campgrounds is they had no requirements to camp!
For overnight stays, most rigs are welcome at commercial warehouse spaces like Wal-Mart, Love’s Gas Stations, and Home Depot.
Did the Reasons Why Skoolies Aren’t Allowed in RV Parks Surprise You?
Having been a part of the skoolie community for several years, I feel like I’ve heard it all. I’m curious though what you thought of the reasons why skoolies aren’t allowed in RV Parks. Let me know in the comments.
As mentioned, we had an overwhelmingly positive experience when we stayed in RV parks in our skoolie. Honestly, this was a preferred method of camping for our family because the parks provided safety and fun for younger kids (limited traffic and loads of amenities like playgrounds and walking paths).
If you liked this post, then I recommend reading the following:
If you’re in the market for a school bus, you’ve likely come across two different designs: the flat-nose bus and the dog-nose bus. Both options have their advantages and disadvantages, and it’s important to understand the differences before making a decision. In this blog post, we’ll take a deep dive into the design, safety, comfort, and maintenance of the Flat-Nose vs. Dog-NoseBus.
I would like to note that both bus styles share small differences in the areas we will be analyzing. At the end of the day, your choice to purchase a school bus for a conversion project will be based on additional factors such as personal preference, price, and availability.
If you’re curious if you’re in the right place, then let me help you out. Our family converted a flat-nose school bus into our dream tiny home on wheels in 2020-2021. Our blog can help you if you are in the beginning stages and looking for a school bus to convert or are looking for a skoolie builder.
Comprehensive Answers to Common Skoolie Myths
We aim to bust the common myths you read about school bus conversions by providing solid resources and research from the skoolie community.
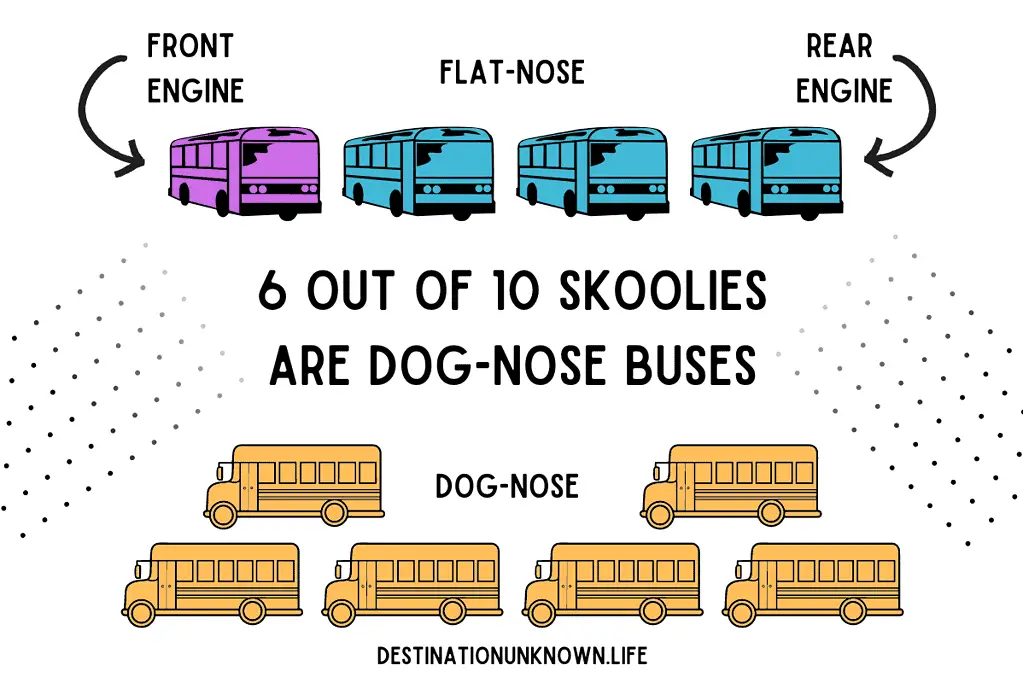
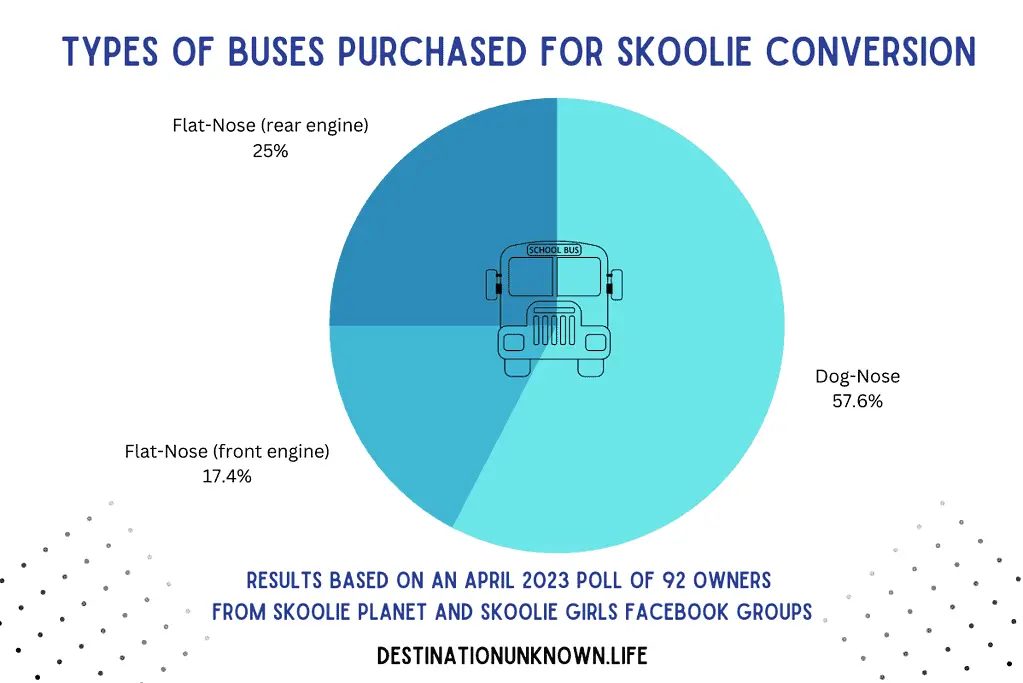
In April 2023, I polled 92 skoolie owners in the Skoolie Planet and Skoolie Girls Facebook Groups to see what type of bus they purchased for conversion:
Flat-nose with a front engine
Flat-nose with a rear engine
Dog-nose (front engine only)
The results surprised me! I expected more people to have flat-nose front engine buses since that was what I saw commonly in my state (Florida); however, the poll participants came from all over North America, thus casting a wider net.
57.6% of skoolie owners purchased a dog-nose bus. The remaining 42.4% owned flat-nose buses. Of the flat-nose bus owners, 41% had front engines and 60% had rear engines!
Our Personal Experience with a Flat-Nose Bus
We purchased a flat-nose front-engine school bus and didn’t mind having the engine block in the cock-pit, though we knew no different to be honest.
When traveling or when the engine was running, it was loud since the engine block is located next to the driver’s seat, though it wasn’t a hindrance when living stationary. Our kids would happily sit or climb on it to get better views through the big front windows.
Design
Overview of design differences
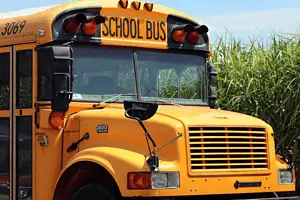
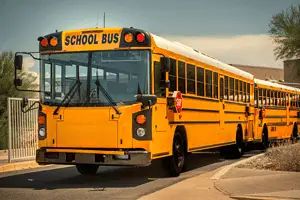
The primary difference between a flat-nose bus and a dog-nose bus is the location of the engine. In a flat-nose bus (also known as a Type D bus), the engine is located inside the bus, either in the driver compartment or in the rear of the bus (aka. A pusher). In a dog-nose bus (also known as a Type C bus), the engine is located in the front of the vehicle, outside of the driver compartment. This would be the same area as standard vehicles like an SUV or car, etc.
Flat-nose bus design features
Flat-nose buses, also known as flat-front buses, offer better visibility for the driver and a smoother ride for passengers due to the engine’s location. Since they have a shorter wheelbase and “snout”, it can make them easier to maneuver in tight spaces. However, the flat-nose design can reduce the useable space in the cockpit since the engine block sits usually in the middle. If it’s in the rear, you’ll still need access to it; however, you could build an movable structure to allow access in the interior (you will also have exterior access).
Additionally, the ride is loud when in a flat-nose bus because the engine is located inside of the bus. Furthermore, the engine puts off a lot of heat, which is beneficial in the winter if you desire warmth; however, in the summer months, you’ll need to ride with the windows open if you don’t have cooling AC while driving.
Dog-nose design features
Dog-nose, also known as snub-nose, buses often have more internal storage space and a quieter ride, as the engine is located outside, farther from the passenger compartment. They also tend to have a more traditional school bus look, which some people prefer.
Safety
Overview of safety differences
Both flat-nose and dog-nose buses are designed to meet strict safety standards. However, there are some differences in how each type of bus performs in certain areas.
Flat-nose safety features
Flat-nose buses offer better visibility for the driver, which can help prevent accidents. Additionally, the engine’s location inside the driver compartment can help absorb impact in the event of a collision.
Dog-nose safety features
Dog-nose buses often have a larger crumple zone due to the engine’s location, which can help absorb impact in the event of a collision. Additionally, the engine’s location can help prevent fires from spreading to the passenger compartment.
Comfort
Overview of passenger experience
Passenger comfort is an important consideration when choosing a school bus. Both flat-nose and dog-nose buses have their advantages and disadvantages when it comes to comfort.
Flat-nose passenger experience
Front-nose buses may have a louder ride since the engine block is located inside the vehicle. The flat-nose design may make for a less spacious interior, since the engine block is either located as you come up the stairs or in the rear of the vehicle.
Dog-nose passenger experience
Dog-nose buses often have a quieter ride, as the engine is located farther from the passenger compartment. Additionally, with the engine’s external location, there is more internal space in the driver’s area.
Maintenance
Overview of maintenance differences
Maintenance is an important factor to consider when choosing a school bus. Both flat-nose and dog-nose buses have their advantages and disadvantages when it comes to maintenance. The risk of damage due to road debris would be about the same since in both cases since the engines are exposed to this.
Flat-nose maintenance considerations
Flat-nose buses have the advantage of easier access to the engine for maintenance and repairs, as it is located inside the driver compartment. However, this also means that any engine issues can potentially impact the driver’s visibility and safety.
Dog-nose maintenance considerations
Dog-nose buses have the advantage of the engine being located outside of the driver compartment, which will usually require a ladder to gain visibility.
FAQ about Flat-Nose versus Dog-Nose Buses
Are flat-nose buses better?
This is subjective and based on personal preference. Flat-nose buses offer better visibility and a smoother ride, while dog-nose buses often have more internal living space since the engine block is located outside and, therefore, a quieter ride. Both options are designed to meet strict safety standards.
What is a dog-nose bus?
A dog-nose bus (also known as a Type C or snub-nose bus) is a school bus design where the engine is located in the front of the vehicle, outside of the driver compartment.
What is a flat-nose bus?
A flat-nose bus (also known as a Type D bus) is a school bus design where the engine is located under the front hood of the vehicle, inside the driver compartment.
How long is a dog-nose bus?
The length of a dog-nose bus can vary, but they typically range from 15 to 35 feet in length.
What type of bus is best for conversion?
Both flat-nose and dog-nose buses can be suitable for conversion, depending on your needs and preferences. Flat-nose buses often offer a more modern exterior look (streamlined) and better driver visibility, while dog-nose buses may offer slightly more interior living space, vintage appeal, and a quieter ride.
Where is the engine on a flat front bus?
The engine on a flat front bus is located under the front hood of the vehicle, inside the driver compartment, or at the rear of the bus.
Conclusion
So, which type of bus is right for you? Ultimately, the decision will come down to your individual needs and preferences. If you prioritize visibility and a smooth ride, a flat-nose bus may be the best option for you. If you prefer more storage space and a quieter ride, a dog-nose bus may be the way to go. Regardless of which type of bus you choose, make sure to prioritize safety, comfort, performance, and maintenance when making your decision.
The detailed guide to DIY a Skoolie Plumbing System!
Use this Skoolie Plumbing System Guide to kickstart your research on skoolie plumbing. We break down the stages and important zones you’ll need to consider, give guidance on testing the DIY skoolie plumbing system, answer frequently asked questions, and recommend products to use, including a link to the exact supplies we put in our build.
It can definitely seem overwhelming to DIY plumb an entire bus with no or limited experience, but it’s completely possible to accomplish – I’m speaking from personal experience.
Fortunately, this type of plumbing system is rather simple to plan out and quite few supplies are actually needed, as you’ll see below. Once you create your design and rough it out with fittings, you’re basically complete (except for the occasional swearing and 10th trip to the plumbing supply store, of course).
If you’re at the beginning stage of your skoolie dream and haven’t purchased your bus yet, check out our ultimate guide on buying a skoolie to convert for the best tips and questions to ask before you buy.
Table of Contents
Skoolie Plumbing Supply List
We purchased the majority of our skoolie supplies on Amazon; however, for plumbing fittings we often ran to our local Home Depot or Lowes as well as local plumbing supply stores. The local stores offered better pricing but the shipping and online convenience of Amazon has its perks.
My husband, Eric, installed the plumbing water and sewer lines himself (I did install the kitchen sink faucet at the very end)!
We hired a licensed plumber to inspect at the rough-in and final stages. He charged about $75 per inspection.
Supply Costs
We spent about $1500 on parts to install our water supply and sewer lines. Labor was basically $0 since we installed the skoolie plumbing system ourselves.
The biggest components of that cost went to the products listed below. The prices stated there are approximate.
In this section, we break down the two major stages of plumbing: rough-in and final. The skoolie plumbing includes fresh water supply and waste water management (also known as a sewer system).
The fresh water supply starts with a fresh water supply port entering the skoolie. This is where water will enter the bus, usually from a hose, and fill the fresh water tank or circumvent the pump, if tying into the grid, and flow directly into the supply lines.
All sewer lines should drain to the gray water holding tank. The gray water tank will have an outlet that a hose can be attached to when draining. If using a composting toilet, then the solid waste can be bagged and disposed of.
Plumbing Rough-in
This is the stage when all the walls are open and framing is complete with studs installed.
This is also the most time-intensive stage as:
you lay out all your water supply lines and sewer lines,
decide what appliances (water heater, water pump) and fixtures (sink, shower, water tanks) they will attach to or from,
make the connections between the fittings,
install back-flow devices, and
pressure test the entire system once all connections are made.
Prior to this stage, you should determine what type of plumbing supply lines you will install in your school bus conversion. The most common options are flexible water lines like PEX or a rigid product like copper.
By far the most popular skoolie water supply lines to use are the flexible PEX water supply lines because they are beginner-friendly for the DIY skoolie conversion builder, and move with your vehicle.
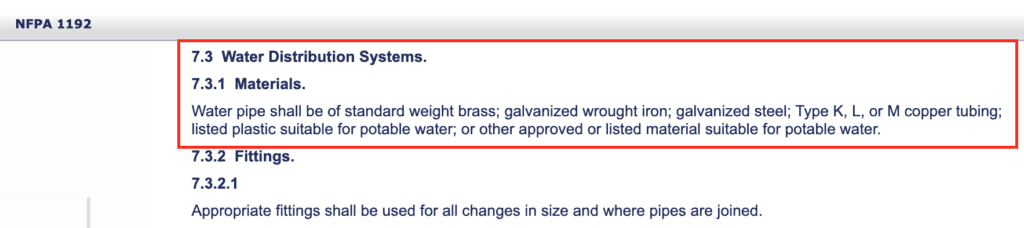
For the skoolie plumbing sewer lines, we went with a flexible white 2″ PVC pipe, which is greater than the minimum for RV code according to NFPA. I’ve included a screenshot below of the support.
We were satisfied with this product as it was easy to work with, especially as we had to run our sewer lines from the bus interior through the floor then across the bus undercarriage to the gray tank. We secured the flexible pipe to the undercarriage with metal zip ties.
At the end of the skoolie plumbing rough-in stage, you should have run all your lines, made your connections and fittings, and pressure tested the entire system for leaks.
Listed below are resources from other skoolie builders and the products they used in their builds. PEX is used the majority of the time.
All PEX should be installed through studs in the bus. We used 2×2” wood studs so the [½”] PEX fit just fine. Be sure to install nail plates on the studs wherever you pass the pex through the wall. This is so that once the walls are closed up, you don’t accidentally puncture a waterline with a screw or nail.
Plumbing Final
Once you make it to the final stage of plumbing your school bus conversion, you’ve survived the really tough parts!
At the final stage, you should ready to trim out your system like installing all of your fixtures like the kitchen and bathroom faucets, shower handle, shower head, and water filtration system. There is really a magical feeling at the final stage because you can really see your dream tiny home on wheels coming to life!
The final stage typically occurs as everything else is coming to an end like your build-out is 90% complete. The framing and insulation are being enclosed and electrical (and solar) are wired in, having all passed their rough-in inspections of their own.
National RV Building Code
My husband also relied on national resources such as the RV building codes from the National Fire Protection Association. You can search their website for tips on standard practice at each stage of your build: framing, plumbing, electrical, sewer, and more.
We aren’t professionals and don’t claim to be. Eric watched tens of hours of YouTube videos educating himself on how to run our plumbing water supply lines and sewer lines correctly. To be extra safe, we also hired a real plumbing professional to review our system at the rough-in and final stages.
We hired a local and trusted plumber to look and provide feedback on our system and paid him $75 at each inspection. A few hundred dollars for an inspection and peace of mind that we have a plumbing system that doesn’t leak was worth it to us. We encourage you to do that too.
If you decide to hire a professional, call around and get quotes from a few, if you don’t know anyone personally.
Are you thinking of hiring a professional to convert your mobile dwelling? Read this blog.
Skoolie Plumbing Zones
Your master plumbing plan is going to be broken up into several major zones. You’ll want to keep these major zones at top of mind as you draw out your skoolie floor plan (download our free skoolie floor plan template here).
Here is a brief summary of the common plumbing zones, though this list is not exhaustive. Scroll down to see an in-depth explanation of what each zone has within it.
Fresh Water Supply (including your fresh water tank)
Kitchen
Shower
Hot Water Heater
Sewer and Gray Water Tank
Drawing out your plumbing zones will help you visualize what water supply lines and water sewer lines you’ll need to run at each major zone, and help plan and prevent any obstacles you may come upon inside and below your rig.
This zone is the start of your interior water supply. It begins with water supply lines connecting to the exterior hookups, typically through the use of a city water hatch (We liked this city water hatch with a lock and key).
Coming in from the exterior, the water supply lines will usually follow two tracks: filling the fresh water tank or, if you are attached to a water source, bypassing the tank and pump to flow directly into the home.
Immediately connected to the water pump should be an accumulator. The accumulator will balance out uneven pressure coming from the tank through the pump, so you don’t experience spotty water pressure.
If you are bypassing the tank, you should bypass the water pump (and optional accumulator), since you should have sufficient pressure from the exterior source.
To determine how much fresh water you’ll need on your rig, read this blog.
Kitchen
This zone will most commonly include water supply lines for a kitchen sink and interior water filter (commonly mounted under the kitchen sink). Additional upgrades in this zone may be water supply and drain lines for a washing machine and fridge ice maker.
You’ll also need to account for sewer lines from this area to the gray water, black tank, or some other way of disposing the waste water.
Shower
This zone will usually house the water supply and sewer lines for the shower, bathroom sink, and toilet.
In our blog on how to build a skoolie shower, we go in-depth on how to run the water lines from the hot water heater, connect the drain lines to the gray water tank underneath the bus, and the supplies we used to finish our skoolie shower like fixtures and ceramic tiles.
Consider installing your hot water heater close to the fresh water supply since it is the shortest run to the main water supply.
If you are installing a propane water heater, then you’ll need to consider its location to the gas line hookups and a space to vent the exhaust, if your unit requires ventilation.
If you want to know how to install liquid propane gas lines in your skoolie using black iron pipe, then read this blog for our installation guide. [coming soon]
Sewer and Gray Water Tank
Any time you have water supply lines going to a zone, you’re going to need to install sewer lines away from this area. It’s a yin-yang balance.
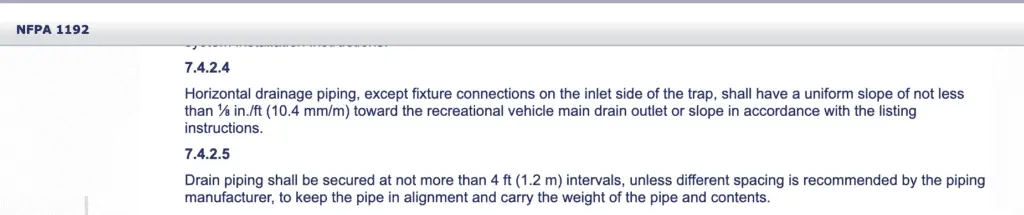
Important factors in this zone are to place your gray tank opposite the fresh water tank to balance the weight across the skoolie, and make sure the sewer lines running to the gray tank are on a 1/8 in per foot downward, unobstructed slope, according to the NFPA.org (see screenshot of the code below). We mounted our 200 gallon gray water tank on the left rear exterior side of the bus (under the shower) and our 200 gallon fresh water tank on the right interior rear side of the bus – basically parallel to one another, behind the rear axel.
Additional zones may include sewer lines for a black tank and water supply and sewer lines for a washing machine.
In the case of a washing machine, you would follow similar steps as in the sink plumbing to attach water lines to the back of the machine and then create a drain set up (like in the Bussy McBusface skoolie build) that flows into your gray tank.
Personally, we really enjoy dropping off our family of five’s laundry off at a laundromat and using the wash-and-fold service. Read about how we do laundry when living in a skoolie here.
How do I pressure test skoolie plumbing water supply lines for leaks?
Once you’ve reached the stage where your DIY skoolie plumbing water supply lines are in, it’s time to pressure test it for leaks!
The tools you’ll need are:
an air compressor
valve
a pressure gauge
caps for the water supply lines
1. Cap off the water supply lines
Go through your bus and cap off any ends, but for two lines (one cold water, one hot water). Choose the easiest lines to access perform the test, so you’re not in a tight space unnecessarily. For example, we tested our water supply lines in the large bedroom so we had plenty of space to move around.
2. Connect the valve and the pressure gauge to the supply lines
Connect the valve and pressure gauge to the water supply lines using the PEX fitting adapters. For example, you’ll put an adapter on the valve (which the air compressor attaches to) on the hot water supply, and an adapter to the pressure gauge attached to the cold water supply.
Honestly, the “pipe temperature” doesn’t matter, but most builds mark red water supply lines for hot water and blue for cold.
3. Charge the water supply lines
Attach the air compressor to the valve using the adapter. Charge the lines to about 100 psi, then wait for up to 8 hours. If you see during that time that there is a huge drop of pressure, then you know there is a leak.
4. Sourcing a water supply leak
If you’ve found leak in your water supply lines after the air pressure test, then it’s time to find the source of it. Depending on the size of the leak, you may need to charge your lines again.
Mix 1/3 cup dish detergent with 2 cups of water, and dip a rag in the mix. You’ll first test all the fittings or joints since loose fittings are the most common causes of leaks. Once you find a leak, the soap will begin to bubble from the air escaping. If that doesn’t solve the issue, next you’ll run the mix down all the actual lines. If you’ve been recently framing, perhaps something punctured the water lines.
Once you locate the leak(s), adjust the fittings or pipes as needed. Pressure test the system again until the psi holds at 100 for 8 hours.
How do I test skoolie plumbing water sewer lines for leaks?
Thankfully, this test will be a fair bit simpler than the air pressure test for the water supply lines. Simply stub off the sewer line going into the tank with something non-absorbent. Next, run 2 cups of water into the system and wait 4 hours.
Prior to running water in your lines, consider installing water detection monitors to catch leaks quickly. They will set off a little alarm once water is detected.
You’ll really want to make sure you have easy access to all the sewer pipes at this stage in case there are leaks.
After that time is up, drain the standing water and you should come out with what you put in. If there is a significant loss of water, then you’ll check for leaks using the same method as mentioned in the above section.
How to pitch your sewer line in your skoolie conversion
It’s worth mentioning that if you are having drainage issues in your rig, you should make sure that you are parked on a flat service or a service with a slight decline towards where you need the waste water to go.
For example, our gray water tank was installed at the rear of our bus, so we make sure to pitch our entire sewer system downward from the furthest point away (the kitchen, in our case). From the kitchen, our sewer drain traveled at a light downward pitch at 1/8 in per foot (according to the NFPA RV Building Code 1192) to the gray water tank.
In severe cases where the waste water just doesn’t drain properly even after parking on a flat, level surface, you can consider purchasing a pump to carry this along to the sewer tank.
How long does it take to install plumbing in a skoolie?
For a complete beginner, I would budget 60 hours dedicated to plumbing. You’ll need to factor in the time it takes you to study and plan your plumbing and sewer layout. I would estimate my husband took at least 20 hours of study and planning time. Budget 5 hours for the initial product and appliance purchases, and 5 more hours to run back-and-forth to the hardware store for missed parts. At the rough-in stage, I would estimate this to take 20 hours and the final stage to take about 10 hours.
Why should you use flexible water supply lines in your skoolie conversion build?
Flexible PEX water supply lines are beginner-friendly for even the most novice builder, and this is what we personally used as complete beginners! The flexible construction and joints are useful in a mobile application like a recreational vehicle, are freeze-resistant, and making repairs is simple compared to a rigid copper pipe when working in small spaces as in a school bus conversion.
As such, flexible PEX water supply lines are the most popular product when running plumbing in a skoolie.
What size PEX water supply lines should you use in your school bus conversion?
Flexible PEX water supply lines come in two main sizes: ½ inch and ¾ inch. Due to the small footprint of a skoolie plumbing system, maintaining consistent water pressure throughout the system should be attainable using the ½ inch water supply lines.
In our school bus conversion, we used the ½ inch PEX water supply lines because we were confident that the flow would be adequate for such a small length of plumbing. In practice, we are happy with our choice and have had no water pressure issues in our mobile plumbing system.
What causes a school bus conversion water supply or sewer leak?
Leaks in the plumbing system are most often going to occur at the joints, where the lines are connected using a fitting. The other cause will result from damage to the water supply line itself.
Water leaks can be devastating, so we recommend install a water leak monitor in the most used and hard to see areas of your rig to catch a leak fast. I recommend two water leak detectors below, depending on your budget.
Working with PEX is beginner-friendly, though by the end you’ll be at an intermediate skill level.
My husband, Eric, spent seven months in 2020-2021 building out our skoolie into our dream tiny home on wheels for our family of five. He had never worked with flexible PEX tubing before or installed any sort of plumbing system with pump and sewer. I’m happy to report we’ve not had any leaks!
Disclosure: Some of the links in this article may be affiliate links, which can provide compensation to me at no cost to you if you decide to purchase a paid plan. Thank you, if you do. As an Amazon Associate I earn from qualifying purchases. This site is not intended to provide financial advice and is for entertainment only. Read our affiliate disclosure in our privacy policy.
Come with me as we dive into the best exterior paint for skoolies. I share what products we used and where you can buy them for your upcoming paint project.
Having painted our rig myself in 2021 and seeing the long-lasting finish of the products I used, I feel confident that the information I’m sharing will help you make the best decision for your upcoming paint project!
Additional Skoolie Paint Resources
Are you going deep into the rabbit hole on skoolie paint? Check out these blogs.
What type of exterior paint should I buy for my school bus conversion?
The type of paint you need for your rig depends on the body construction. If you purchased a retired school bus, the exterior is likely stainless steel or some other metal. In this case, it’s imperative that you choose a paint primer and tinted enamel paint that is made for:
Exterior
Durable, long-lasting finish
Metal
Rust-resistant
Oil-based
Budget-friendly
You can also use an automotive primer and paint, though these may come at a higher price point than the other oil-based paints that you can find at your hardware store.
Oil-Based vs. Latex Paint for a Skoolie
I recommend that you use an oil-based primer and paint (enamel) rather than a latex product for the exterior. Oil-based paint can be more forgiving, if and when you need to do sanding and touch-ups. Oil paint does smell so you’ll want to work with this in an open spaces with ventilation.
For the interior, I recommend using latex paint since it’s indoors and doesn’t put off the same odor as oil paint does.
In both cases, if you’re working on an unpainted surface like metal or wood, prime before applying the top coat.
What is the best exterior paint to buy for a school bus conversion?
We recommend products like Rustoleum and Valspar Anti-Rust Armor Enamel. Rustoleum products aren’t tintable but do come in a wide range of colors, especially for farming equipment like tractors.
Valspar Anti-Rust Armor (Oil-base) vs. Rust-Oleum (Oil-base)
If we hadn’t come across Valspar Anti-Rust Armor, we would have chosen a Rust-Oleum product, which has a good history and is easy to find at hardware stores. However, we wanted to make a custom color choice and the Rust-Oleum products on the market cannot be tinted though they offer a wide range of colors.
Valspar is the Lowe’s paint brand and you can purchase it there or on Amazon. Rustoleum is found at most hardware and paint stores, and on Amazon.
Both of these products are affordable, falling in about the same price range as a normal can of household paint.
Valspar is the home brand for Lowe’s Home Improvement stores, and you can only purchase it in their paint department or on Amazon.
How do I calculate how much paint I need for my Skoolie?
We recommend using a paint calculator to determine how much primer and paint enamel you will need to paint your school bus conversion.
Sherwin Williams has a paint calculator and I’ve linked that below.
We hired a professional painter to prep, prime, and paint the interior of our school bus. It took him two days (a total of 8 hours) to do the work and we paid him $750. The cost included paint and labor.
The prep work took the longest because he had to protect all of the products and fixtures in our completed rig. We also removed all cushions and personal belongings so he could work around everything.
Conclusion
Did you paint your skoolie with latex or oil paint? Let me know in the comments below.