If you’re in the market for a school bus, you’ve likely come across two different designs: the flat-nose bus and the dog-nose bus. Both options have their advantages and disadvantages, and it’s important to understand the differences before making a decision. In this blog post, we’ll take a deep dive into the design, safety, comfort, and maintenance of the Flat-Nose vs. Dog-NoseBus.
I would like to note that both bus styles share small differences in the areas we will be analyzing. At the end of the day, your choice to purchase a school bus for a conversion project will be based on additional factors such as personal preference, price, and availability.
If you’re curious if you’re in the right place, then let me help you out. Our family converted a flat-nose school bus into our dream tiny home on wheels in 2020-2021. Our blog can help you if you are in the beginning stages and looking for a school bus to convert or are looking for a skoolie builder.
Comprehensive Answers to Common Skoolie Myths
We aim to bust the common myths you read about school bus conversions by providing solid resources and research from the skoolie community.
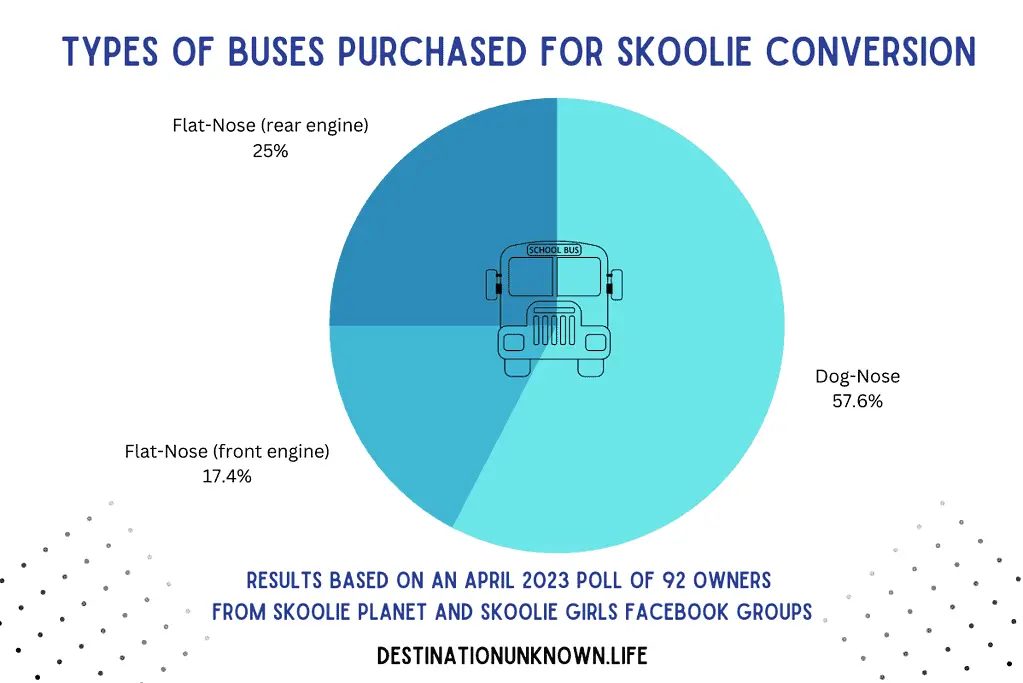
In April 2023, I polled 92 skoolie owners in the Skoolie Planet and Skoolie Girls Facebook Groups to see what type of bus they purchased for conversion:
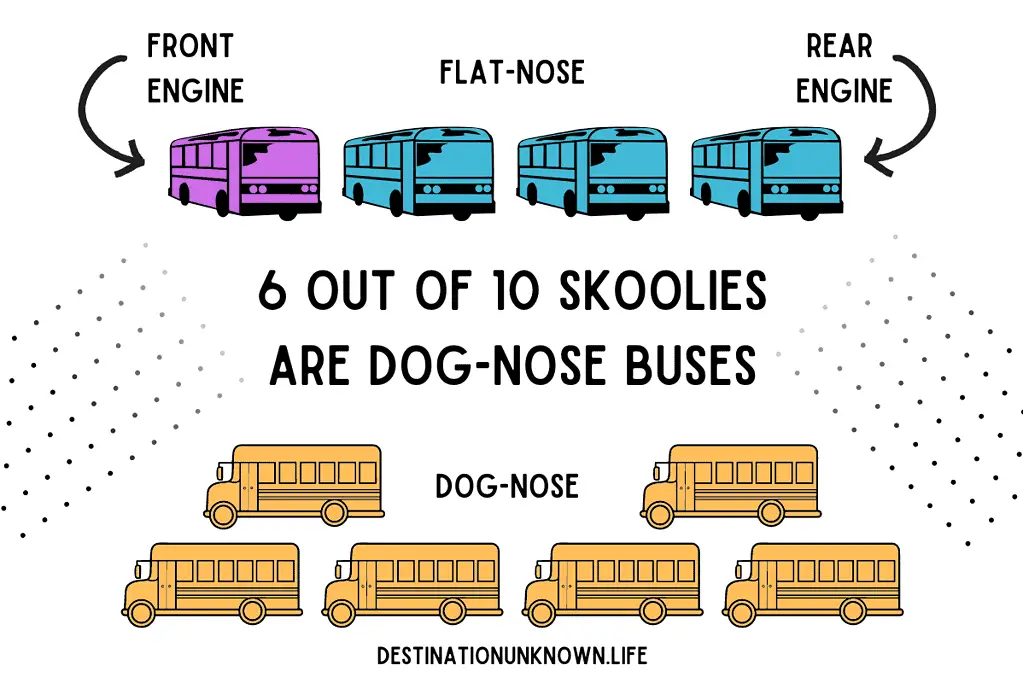
Flat-nose with a front engine
Flat-nose with a rear engine
Dog-nose (front engine only)
The results surprised me! I expected more people to have flat-nose front engine buses since that was what I saw commonly in my state (Florida); however, the poll participants came from all over North America, thus casting a wider net.
57.6% of skoolie owners purchased a dog-nose bus. The remaining 42.4% owned flat-nose buses. Of the flat-nose bus owners, 41% had front engines and 60% had rear engines!
Our Personal Experience with a Flat-Nose Bus
We purchased a flat-nose front-engine school bus and didn’t mind having the engine block in the cock-pit, though we knew no different to be honest.
When traveling or when the engine was running, it was loud since the engine block is located next to the driver’s seat, though it wasn’t a hindrance when living stationary. Our kids would happily sit or climb on it to get better views through the big front windows.
Design
Overview of design differences
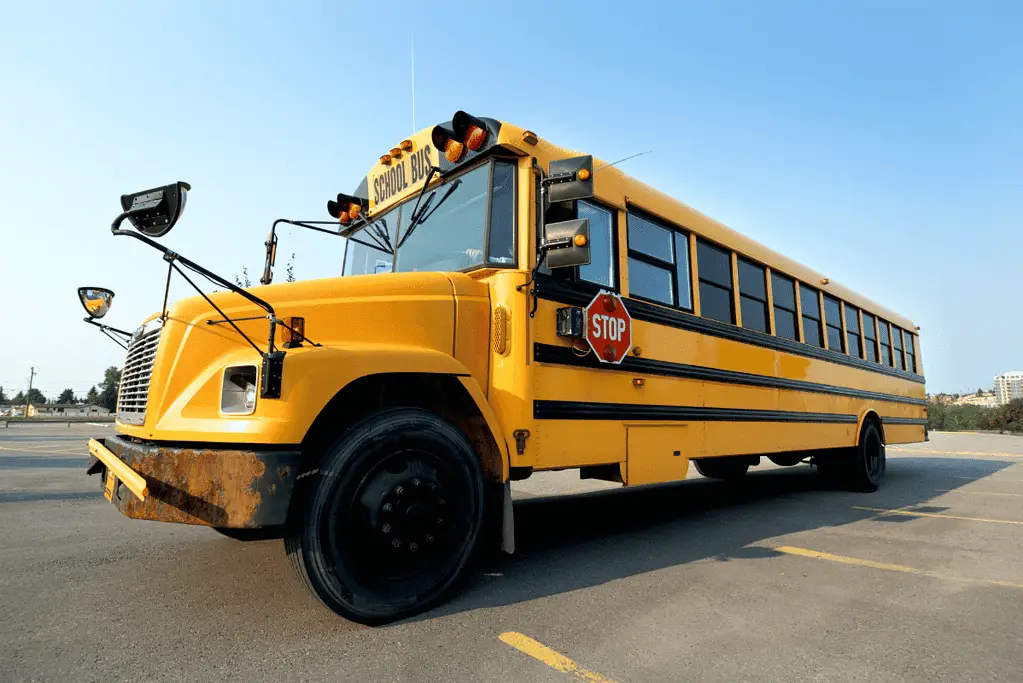
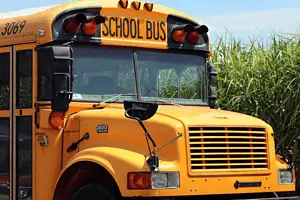
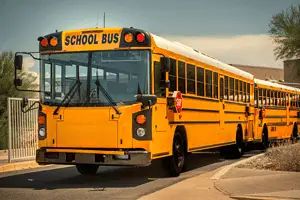
The primary difference between a flat-nose bus and a dog-nose bus is the location of the engine. In a flat-nose bus (also known as a Type D bus), the engine is located inside the bus, either in the driver compartment or in the rear of the bus (aka. A pusher). In a dog-nose bus (also known as a Type C bus), the engine is located in the front of the vehicle, outside of the driver compartment. This would be the same area as standard vehicles like an SUV or car, etc.
Flat-nose bus design features
Flat-nose buses, also known as flat-front buses, offer better visibility for the driver and a smoother ride for passengers due to the engine’s location. Since they have a shorter wheelbase and “snout”, it can make them easier to maneuver in tight spaces. However, the flat-nose design can reduce the useable space in the cockpit since the engine block sits usually in the middle. If it’s in the rear, you’ll still need access to it; however, you could build an movable structure to allow access in the interior (you will also have exterior access).
Additionally, the ride is loud when in a flat-nose bus because the engine is located inside of the bus. Furthermore, the engine puts off a lot of heat, which is beneficial in the winter if you desire warmth; however, in the summer months, you’ll need to ride with the windows open if you don’t have cooling AC while driving.
Dog-nose design features
Dog-nose, also known as snub-nose, buses often have more internal storage space and a quieter ride, as the engine is located outside, farther from the passenger compartment. They also tend to have a more traditional school bus look, which some people prefer.
Safety
Overview of safety differences
Both flat-nose and dog-nose buses are designed to meet strict safety standards. However, there are some differences in how each type of bus performs in certain areas.
Flat-nose safety features
Flat-nose buses offer better visibility for the driver, which can help prevent accidents. Additionally, the engine’s location inside the driver compartment can help absorb impact in the event of a collision.
Dog-nose safety features
Dog-nose buses often have a larger crumple zone due to the engine’s location, which can help absorb impact in the event of a collision. Additionally, the engine’s location can help prevent fires from spreading to the passenger compartment.
Comfort
Overview of passenger experience
Passenger comfort is an important consideration when choosing a school bus. Both flat-nose and dog-nose buses have their advantages and disadvantages when it comes to comfort.
Flat-nose passenger experience
Front-nose buses may have a louder ride since the engine block is located inside the vehicle. The flat-nose design may make for a less spacious interior, since the engine block is either located as you come up the stairs or in the rear of the vehicle.
Dog-nose passenger experience
Dog-nose buses often have a quieter ride, as the engine is located farther from the passenger compartment. Additionally, with the engine’s external location, there is more internal space in the driver’s area.
Maintenance
Overview of maintenance differences
Maintenance is an important factor to consider when choosing a school bus. Both flat-nose and dog-nose buses have their advantages and disadvantages when it comes to maintenance. The risk of damage due to road debris would be about the same since in both cases since the engines are exposed to this.
Flat-nose maintenance considerations
Flat-nose buses have the advantage of easier access to the engine for maintenance and repairs, as it is located inside the driver compartment. However, this also means that any engine issues can potentially impact the driver’s visibility and safety.
Dog-nose maintenance considerations
Dog-nose buses have the advantage of the engine being located outside of the driver compartment, which will usually require a ladder to gain visibility.
FAQ about Flat-Nose versus Dog-Nose Buses
Are flat-nose buses better?
This is subjective and based on personal preference. Flat-nose buses offer better visibility and a smoother ride, while dog-nose buses often have more internal living space since the engine block is located outside and, therefore, a quieter ride. Both options are designed to meet strict safety standards.
What is a dog-nose bus?
A dog-nose bus (also known as a Type C or snub-nose bus) is a school bus design where the engine is located in the front of the vehicle, outside of the driver compartment.
What is a flat-nose bus?
A flat-nose bus (also known as a Type D bus) is a school bus design where the engine is located under the front hood of the vehicle, inside the driver compartment.
How long is a dog-nose bus?
The length of a dog-nose bus can vary, but they typically range from 15 to 35 feet in length.
What type of bus is best for conversion?
Both flat-nose and dog-nose buses can be suitable for conversion, depending on your needs and preferences. Flat-nose buses often offer a more modern exterior look (streamlined) and better driver visibility, while dog-nose buses may offer slightly more interior living space, vintage appeal, and a quieter ride.
Where is the engine on a flat front bus?
The engine on a flat front bus is located under the front hood of the vehicle, inside the driver compartment, or at the rear of the bus.
Conclusion
So, which type of bus is right for you? Ultimately, the decision will come down to your individual needs and preferences. If you prioritize visibility and a smooth ride, a flat-nose bus may be the best option for you. If you prefer more storage space and a quieter ride, a dog-nose bus may be the way to go. Regardless of which type of bus you choose, make sure to prioritize safety, comfort, performance, and maintenance when making your decision.
The detailed guide to DIY a Skoolie Plumbing System!
Use this Skoolie Plumbing System Guide to kickstart your research on skoolie plumbing. We break down the stages and important zones you’ll need to consider, give guidance on testing the DIY skoolie plumbing system, answer frequently asked questions, and recommend products to use, including a link to the exact supplies we put in our build.
It can definitely seem overwhelming to DIY plumb an entire bus with no or limited experience, but it’s completely possible to accomplish – I’m speaking from personal experience.
Fortunately, this type of plumbing system is rather simple to plan out and quite few supplies are actually needed, as you’ll see below. Once you create your design and rough it out with fittings, you’re basically complete (except for the occasional swearing and 10th trip to the plumbing supply store, of course).
If you’re at the beginning stage of your skoolie dream and haven’t purchased your bus yet, check out our ultimate guide on buying a skoolie to convert for the best tips and questions to ask before you buy.
Table of Contents
Skoolie Plumbing Supply List
We purchased the majority of our skoolie supplies on Amazon; however, for plumbing fittings we often ran to our local Home Depot or Lowes as well as local plumbing supply stores. The local stores offered better pricing but the shipping and online convenience of Amazon has its perks.
My husband, Eric, installed the plumbing water and sewer lines himself (I did install the kitchen sink faucet at the very end)!
We hired a licensed plumber to inspect at the rough-in and final stages. He charged about $75 per inspection.
Supply Costs
We spent about $1500 on parts to install our water supply and sewer lines. Labor was basically $0 since we installed the skoolie plumbing system ourselves.
The biggest components of that cost went to the products listed below. The prices stated there are approximate.
In this section, we break down the two major stages of plumbing: rough-in and final. The skoolie plumbing includes fresh water supply and waste water management (also known as a sewer system).
The fresh water supply starts with a fresh water supply port entering the skoolie. This is where water will enter the bus, usually from a hose, and fill the fresh water tank or circumvent the pump, if tying into the grid, and flow directly into the supply lines.
All sewer lines should drain to the gray water holding tank. The gray water tank will have an outlet that a hose can be attached to when draining. If using a composting toilet, then the solid waste can be bagged and disposed of.
Plumbing Rough-in
This is the stage when all the walls are open and framing is complete with studs installed.
This is also the most time-intensive stage as:
you lay out all your water supply lines and sewer lines,
decide what appliances (water heater, water pump) and fixtures (sink, shower, water tanks) they will attach to or from,
make the connections between the fittings,
install back-flow devices, and
pressure test the entire system once all connections are made.
Prior to this stage, you should determine what type of plumbing supply lines you will install in your school bus conversion. The most common options are flexible water lines like PEX or a rigid product like copper.
By far the most popular skoolie water supply lines to use are the flexible PEX water supply lines because they are beginner-friendly for the DIY skoolie conversion builder, and move with your vehicle.
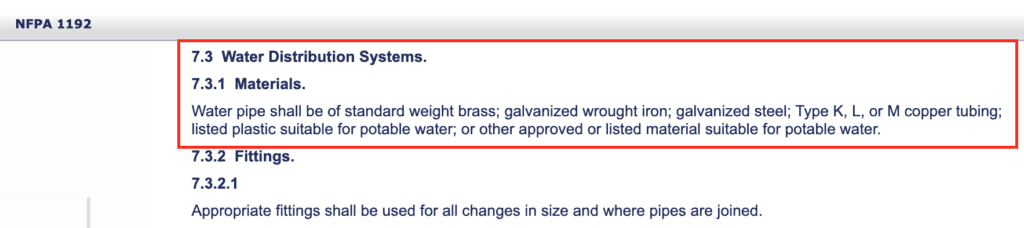
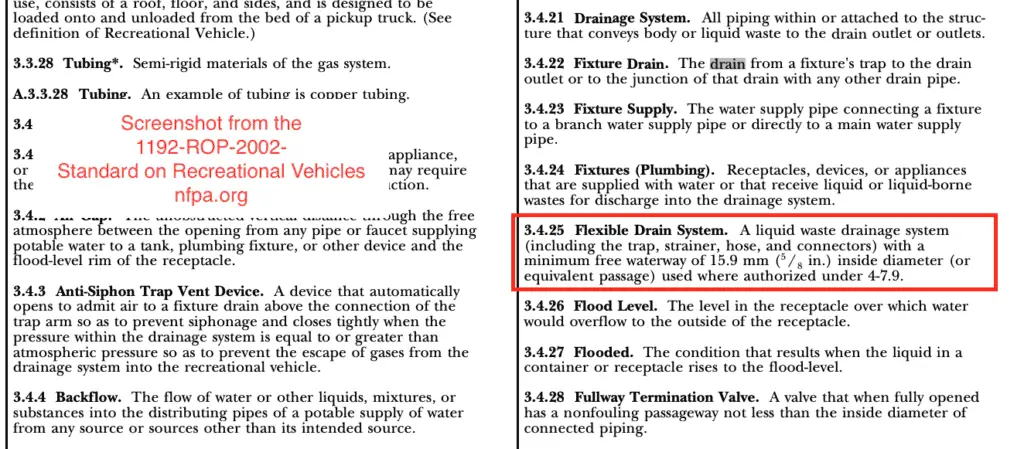
For the skoolie plumbing sewer lines, we went with a flexible white 2″ PVC pipe, which is greater than the minimum for RV code according to NFPA. I’ve included a screenshot below of the support.
We were satisfied with this product as it was easy to work with, especially as we had to run our sewer lines from the bus interior through the floor then across the bus undercarriage to the gray tank. We secured the flexible pipe to the undercarriage with metal zip ties.
At the end of the skoolie plumbing rough-in stage, you should have run all your lines, made your connections and fittings, and pressure tested the entire system for leaks.
Listed below are resources from other skoolie builders and the products they used in their builds. PEX is used the majority of the time.
All PEX should be installed through studs in the bus. We used 2×2” wood studs so the [½”] PEX fit just fine. Be sure to install nail plates on the studs wherever you pass the pex through the wall. This is so that once the walls are closed up, you don’t accidentally puncture a waterline with a screw or nail.
Plumbing Final
Once you make it to the final stage of plumbing your school bus conversion, you’ve survived the really tough parts!
At the final stage, you should ready to trim out your system like installing all of your fixtures like the kitchen and bathroom faucets, shower handle, shower head, and water filtration system. There is really a magical feeling at the final stage because you can really see your dream tiny home on wheels coming to life!
The final stage typically occurs as everything else is coming to an end like your build-out is 90% complete. The framing and insulation are being enclosed and electrical (and solar) are wired in, having all passed their rough-in inspections of their own.
National RV Building Code
My husband also relied on national resources such as the RV building codes from the National Fire Protection Association. You can search their website for tips on standard practice at each stage of your build: framing, plumbing, electrical, sewer, and more.
We aren’t professionals and don’t claim to be. Eric watched tens of hours of YouTube videos educating himself on how to run our plumbing water supply lines and sewer lines correctly. To be extra safe, we also hired a real plumbing professional to review our system at the rough-in and final stages.
We hired a local and trusted plumber to look and provide feedback on our system and paid him $75 at each inspection. A few hundred dollars for an inspection and peace of mind that we have a plumbing system that doesn’t leak was worth it to us. We encourage you to do that too.
If you decide to hire a professional, call around and get quotes from a few, if you don’t know anyone personally.
Are you thinking of hiring a professional to convert your mobile dwelling? Read this blog.
Skoolie Plumbing Zones
Your master plumbing plan is going to be broken up into several major zones. You’ll want to keep these major zones at top of mind as you draw out your skoolie floor plan (download our free skoolie floor plan template here).
Here is a brief summary of the common plumbing zones, though this list is not exhaustive. Scroll down to see an in-depth explanation of what each zone has within it.
Fresh Water Supply (including your fresh water tank)
Kitchen
Shower
Hot Water Heater
Sewer and Gray Water Tank
Drawing out your plumbing zones will help you visualize what water supply lines and water sewer lines you’ll need to run at each major zone, and help plan and prevent any obstacles you may come upon inside and below your rig.
This zone is the start of your interior water supply. It begins with water supply lines connecting to the exterior hookups, typically through the use of a city water hatch (We liked this city water hatch with a lock and key).
Coming in from the exterior, the water supply lines will usually follow two tracks: filling the fresh water tank or, if you are attached to a water source, bypassing the tank and pump to flow directly into the home.
Immediately connected to the water pump should be an accumulator. The accumulator will balance out uneven pressure coming from the tank through the pump, so you don’t experience spotty water pressure.
If you are bypassing the tank, you should bypass the water pump (and optional accumulator), since you should have sufficient pressure from the exterior source.
To determine how much fresh water you’ll need on your rig, read this blog.
Kitchen
This zone will most commonly include water supply lines for a kitchen sink and interior water filter (commonly mounted under the kitchen sink). Additional upgrades in this zone may be water supply and drain lines for a washing machine and fridge ice maker.
You’ll also need to account for sewer lines from this area to the gray water, black tank, or some other way of disposing the waste water.
Shower
This zone will usually house the water supply and sewer lines for the shower, bathroom sink, and toilet.
In our blog on how to build a skoolie shower, we go in-depth on how to run the water lines from the hot water heater, connect the drain lines to the gray water tank underneath the bus, and the supplies we used to finish our skoolie shower like fixtures and ceramic tiles.
Consider installing your hot water heater close to the fresh water supply since it is the shortest run to the main water supply.
If you are installing a propane water heater, then you’ll need to consider its location to the gas line hookups and a space to vent the exhaust, if your unit requires ventilation.
If you want to know how to install liquid propane gas lines in your skoolie using black iron pipe, then read this blog for our installation guide. [coming soon]
Sewer and Gray Water Tank
Any time you have water supply lines going to a zone, you’re going to need to install sewer lines away from this area. It’s a yin-yang balance.
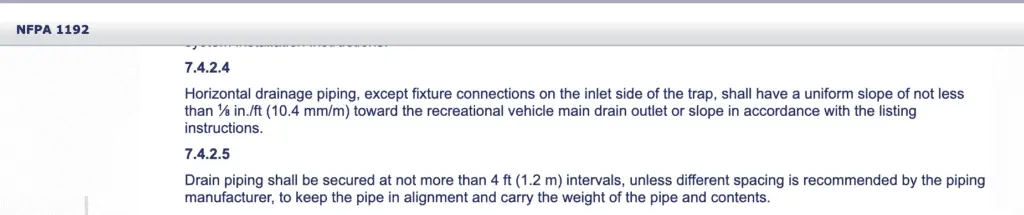
Important factors in this zone are to place your gray tank opposite the fresh water tank to balance the weight across the skoolie, and make sure the sewer lines running to the gray tank are on a 1/8 in per foot downward, unobstructed slope, according to the NFPA.org (see screenshot of the code below). We mounted our 200 gallon gray water tank on the left rear exterior side of the bus (under the shower) and our 200 gallon fresh water tank on the right interior rear side of the bus – basically parallel to one another, behind the rear axel.
Additional zones may include sewer lines for a black tank and water supply and sewer lines for a washing machine.
In the case of a washing machine, you would follow similar steps as in the sink plumbing to attach water lines to the back of the machine and then create a drain set up (like in the Bussy McBusface skoolie build) that flows into your gray tank.
Personally, we really enjoy dropping off our family of five’s laundry off at a laundromat and using the wash-and-fold service. Read about how we do laundry when living in a skoolie here.
How do I pressure test skoolie plumbing water supply lines for leaks?
Once you’ve reached the stage where your DIY skoolie plumbing water supply lines are in, it’s time to pressure test it for leaks!
The tools you’ll need are:
an air compressor
valve
a pressure gauge
caps for the water supply lines
1. Cap off the water supply lines
Go through your bus and cap off any ends, but for two lines (one cold water, one hot water). Choose the easiest lines to access perform the test, so you’re not in a tight space unnecessarily. For example, we tested our water supply lines in the large bedroom so we had plenty of space to move around.
2. Connect the valve and the pressure gauge to the supply lines
Connect the valve and pressure gauge to the water supply lines using the PEX fitting adapters. For example, you’ll put an adapter on the valve (which the air compressor attaches to) on the hot water supply, and an adapter to the pressure gauge attached to the cold water supply.
Honestly, the “pipe temperature” doesn’t matter, but most builds mark red water supply lines for hot water and blue for cold.
3. Charge the water supply lines
Attach the air compressor to the valve using the adapter. Charge the lines to about 100 psi, then wait for up to 8 hours. If you see during that time that there is a huge drop of pressure, then you know there is a leak.
4. Sourcing a water supply leak
If you’ve found leak in your water supply lines after the air pressure test, then it’s time to find the source of it. Depending on the size of the leak, you may need to charge your lines again.
Mix 1/3 cup dish detergent with 2 cups of water, and dip a rag in the mix. You’ll first test all the fittings or joints since loose fittings are the most common causes of leaks. Once you find a leak, the soap will begin to bubble from the air escaping. If that doesn’t solve the issue, next you’ll run the mix down all the actual lines. If you’ve been recently framing, perhaps something punctured the water lines.
Once you locate the leak(s), adjust the fittings or pipes as needed. Pressure test the system again until the psi holds at 100 for 8 hours.
How do I test skoolie plumbing water sewer lines for leaks?
Thankfully, this test will be a fair bit simpler than the air pressure test for the water supply lines. Simply stub off the sewer line going into the tank with something non-absorbent. Next, run 2 cups of water into the system and wait 4 hours.
Prior to running water in your lines, consider installing water detection monitors to catch leaks quickly. They will set off a little alarm once water is detected.
You’ll really want to make sure you have easy access to all the sewer pipes at this stage in case there are leaks.
After that time is up, drain the standing water and you should come out with what you put in. If there is a significant loss of water, then you’ll check for leaks using the same method as mentioned in the above section.
How to pitch your sewer line in your skoolie conversion
It’s worth mentioning that if you are having drainage issues in your rig, you should make sure that you are parked on a flat service or a service with a slight decline towards where you need the waste water to go.
For example, our gray water tank was installed at the rear of our bus, so we make sure to pitch our entire sewer system downward from the furthest point away (the kitchen, in our case). From the kitchen, our sewer drain traveled at a light downward pitch at 1/8 in per foot (according to the NFPA RV Building Code 1192) to the gray water tank.
In severe cases where the waste water just doesn’t drain properly even after parking on a flat, level surface, you can consider purchasing a pump to carry this along to the sewer tank.
How long does it take to install plumbing in a skoolie?
For a complete beginner, I would budget 60 hours dedicated to plumbing. You’ll need to factor in the time it takes you to study and plan your plumbing and sewer layout. I would estimate my husband took at least 20 hours of study and planning time. Budget 5 hours for the initial product and appliance purchases, and 5 more hours to run back-and-forth to the hardware store for missed parts. At the rough-in stage, I would estimate this to take 20 hours and the final stage to take about 10 hours.
Why should you use flexible water supply lines in your skoolie conversion build?
Flexible PEX water supply lines are beginner-friendly for even the most novice builder, and this is what we personally used as complete beginners! The flexible construction and joints are useful in a mobile application like a recreational vehicle, are freeze-resistant, and making repairs is simple compared to a rigid copper pipe when working in small spaces as in a school bus conversion.
As such, flexible PEX water supply lines are the most popular product when running plumbing in a skoolie.
What size PEX water supply lines should you use in your school bus conversion?
Flexible PEX water supply lines come in two main sizes: ½ inch and ¾ inch. Due to the small footprint of a skoolie plumbing system, maintaining consistent water pressure throughout the system should be attainable using the ½ inch water supply lines.
In our school bus conversion, we used the ½ inch PEX water supply lines because we were confident that the flow would be adequate for such a small length of plumbing. In practice, we are happy with our choice and have had no water pressure issues in our mobile plumbing system.
What causes a school bus conversion water supply or sewer leak?
Leaks in the plumbing system are most often going to occur at the joints, where the lines are connected using a fitting. The other cause will result from damage to the water supply line itself.
Water leaks can be devastating, so we recommend install a water leak monitor in the most used and hard to see areas of your rig to catch a leak fast. I recommend two water leak detectors below, depending on your budget.
Working with PEX is beginner-friendly, though by the end you’ll be at an intermediate skill level.
My husband, Eric, spent seven months in 2020-2021 building out our skoolie into our dream tiny home on wheels for our family of five. He had never worked with flexible PEX tubing before or installed any sort of plumbing system with pump and sewer. I’m happy to report we’ve not had any leaks!
Disclosure: Some of the links in this article may be affiliate links, which can provide compensation to me at no cost to you if you decide to purchase a paid plan. Thank you, if you do. As an Amazon Associate I earn from qualifying purchases. This site is not intended to provide financial advice and is for entertainment only. Read our affiliate disclosure in our privacy policy.
Come with me as we dive into the best exterior paint for skoolies. I share what products we used and where you can buy them for your upcoming paint project.
Having painted our rig myself in 2021 and seeing the long-lasting finish of the products I used, I feel confident that the information I’m sharing will help you make the best decision for your upcoming paint project!
Additional Skoolie Paint Resources
Are you going deep into the rabbit hole on skoolie paint? Check out these blogs.
What type of exterior paint should I buy for my school bus conversion?
The type of paint you need for your rig depends on the body construction. If you purchased a retired school bus, the exterior is likely stainless steel or some other metal. In this case, it’s imperative that you choose a paint primer and tinted enamel paint that is made for:
Exterior
Durable, long-lasting finish
Metal
Rust-resistant
Oil-based
Budget-friendly
You can also use an automotive primer and paint, though these may come at a higher price point than the other oil-based paints that you can find at your hardware store.
Oil-Based vs. Latex Paint for a Skoolie
I recommend that you use an oil-based primer and paint (enamel) rather than a latex product for the exterior. Oil-based paint can be more forgiving, if and when you need to do sanding and touch-ups. Oil paint does smell so you’ll want to work with this in an open spaces with ventilation.
For the interior, I recommend using latex paint since it’s indoors and doesn’t put off the same odor as oil paint does.
In both cases, if you’re working on an unpainted surface like metal or wood, prime before applying the top coat.
What is the best exterior paint to buy for a school bus conversion?
We recommend products like Rustoleum and Valspar Anti-Rust Armor Enamel. Rustoleum products aren’t tintable but do come in a wide range of colors, especially for farming equipment like tractors.
Valspar Anti-Rust Armor (Oil-base) vs. Rust-Oleum (Oil-base)
If we hadn’t come across Valspar Anti-Rust Armor, we would have chosen a Rust-Oleum product, which has a good history and is easy to find at hardware stores. However, we wanted to make a custom color choice and the Rust-Oleum products on the market cannot be tinted though they offer a wide range of colors.
Valspar is the Lowe’s paint brand and you can purchase it there or on Amazon. Rustoleum is found at most hardware and paint stores, and on Amazon.
Both of these products are affordable, falling in about the same price range as a normal can of household paint.
Valspar is the home brand for Lowe’s Home Improvement stores, and you can only purchase it in their paint department or on Amazon.
How do I calculate how much paint I need for my Skoolie?
We recommend using a paint calculator to determine how much primer and paint enamel you will need to paint your school bus conversion.
Sherwin Williams has a paint calculator and I’ve linked that below.
We hired a professional painter to prep, prime, and paint the interior of our school bus. It took him two days (a total of 8 hours) to do the work and we paid him $750. The cost included paint and labor.
The prep work took the longest because he had to protect all of the products and fixtures in our completed rig. We also removed all cushions and personal belongings so he could work around everything.
Conclusion
Did you paint your skoolie with latex or oil paint? Let me know in the comments below.
Painting the roof of your rig is an important step in protecting the interior contents that you put so much work into remodeling. This blog details the product we purchased to paint our roof, why we purchased it, how it’s holding up after 2+ years, and how we applied it.
Are you going deep into the rabbit hole on skoolie paint? Check out these blogs.
It’s worth noting that there are a number of ways that you can protect your skoolie roof, and this was how we did it.
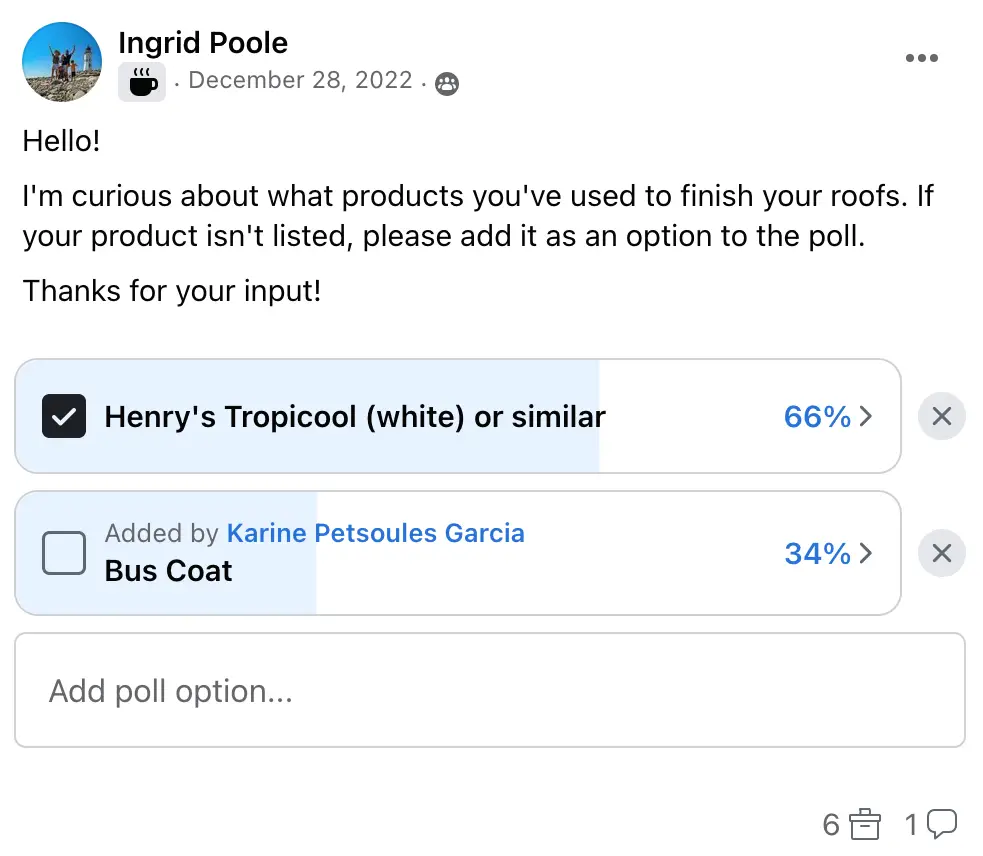
I created a poll in the Skoolie Girls forum asking what products they used on their roof, and the majority used Henry’s Tropicool.
If you did yours differently, please comment below what product(s) you used, how it’s holding up, and why you went with it.
Poll on Skoolie Roof Paint Product Used
White Elastomeric Paint for our Skoolie Roof
Henry’s Tropicool
Our home base is in Florida, which has heavy rainstorms and high temperatures. We purchased a product that is well-rated for these conditions following feedback from others within the skoolie and mobile home communities.
We settled on a white elastomeric paint called Henry’s Tropicool. It helps to seal cracks and it also reflects heat and high temperatures with the white finish.
The paint dries to a tacky texture, so just be aware of that. If you need to do any touch-up paint, it doesn’t sand all that easily. With that being said, I feel safer with the tacky texture when I have to be up on the roof because I feel like it grips my feet better than normal paint would.
How to Paint A Skoolie Roof
Prep a Skoolie Roof for Paint
Patch Any Holes
This is kind of a no-brainer. Patch any holes from light fixtures that have been removed before you can properly seal your house.
If your body is a stainless steel construction, you can buy new or reuse stainless steel sheets from your conversion to patch holes. We used an automotive grade caulk to seal small patches, like a sandwich. We went around the exterior seams of those patches with Henry’s Tropicool caulk.
If a larger area needs to be sealed, then you may need to use a rivet gun with rivets, or a welding kit with solder to complete the job.
Caulk the Seams
We used two products to caulk the seams on the roof of our rig. The first was a product made by Henry’s Tropicool, and we put that in all the exterior seams and edges where there would be movement. On areas where we had patches or had drilled through the interior to the exterior like when we installed our solar panels or roof-mount fans, we used an automotive sealant to create a strong bond.
Sand the Roof
We weren’t so concerned about a smooth finish on a roof, since no one would see it. You can sand earlier in the prep process or just before rolling the paint. We used an orbital sander with 80 to 120-grit sandpaper to lightly scuff the existing top coat. We did this so the new product would have better adhesion.
Do not sand heavily and take off the paint down to the metal.
Wash and Scrub
You’ll want to be very careful when you do this step since water on a slick metal surface can be slippery! My best practice was to scrub the surface on my hands and knees with a household scrubby brush.
The cleaning product I used was Evergreen. After you scrub the surface with a detergent of some kind, then rinse the roof two or three times and make sure there is no debris collecting in the drip rails (lip on the edge of the roof), so that way you have a clean service to paint.
Paint the Skoolie Roof
Once your surface is completely dry, you’ll use a paint roller with a thick nap on an extendable pole to roll your product while on the roof. If you’re not sure what nap to use, check to see what the product manufacturer or your paint supply store recommends.
We applied two coats for an even finish. On the hard-to-reach places, I used a regular brush to apply.
Safety Tips
When painting the drip edge of the bus, I climbed on a ladder from the ground so I didn’t have to lean over the edge from the roof.
This product is not like most paints I’ve worked with. It has a rubbery texture and doesn’t wash off easily like latex paint does. I would highly recommend protecting yourself by wearing gloves and protective goggles.
Frequently Asked Questions
Why Should I Paint My Skoolie RV Roof White?
It’s widely known that white surfaces reflect sunlight and heat much better than darker surfaces. Reflecting the heat reduces the inside temperatures of the bus, making it more comfortable for passengers and more energy-efficient for powering the A/C.
In temperate climates like Florida, anything we can do to reflect the sun’s harsh rays is a win for us and the internal temperature of our mobile home!
There is science behind it, specific to the bus community.
Ten years ago, the Transport for London introduced a programme for the installation of white panels atop the capital’s trademark red buses in the framework of further climate-adaptation plans. More specifically, white panels reflect the rays of the summer sun, thus keeping the vehicles cooler. After 10 years, 98.5 percent of the fleet of 8,700 has white roofs, thus improving the overall conditions for passengers and drivers as well as reducing fuel consumption for air conditioning systems.
How often should I repaint or recaulk the seams on my skoolie roof?
Depending on the conditions where you live, manufacturer recommendations, and how you store your rig, you may need to repaint a skoolie roof every 3 to 5 years and recaulk the seams every 2 to 4 years.
We store our rig in an uncovered location in Florida year-round. In our scenario, we need to recaulk the roof seams every one to two years and repaint the entire roof in five years.
We recommend inspecting your interior and exterior for leaks every three to six months, depending on usage and storage.
How much skoolie roof paint do I need?
I recommend buying one to two gallons, depending on your rig size. We purchased a 5-gallon container of Henry’s Tropicool for our 37-foot rig. I used about two gallons over two coats and gave the rest away to a friend!
For details on the paint we purchased for our skoolie exterior body, read this blog.
How do I calculate how much paint I need for my Skoolie roof?
We recommend using a paint calculator to determine how much primer and paint enamel you will need to paint your school bus conversion.
Sherwin Williams has a paint calculator and I’ve linked that below.
What products did you use to paint your skoolie roof? How has it held up? Let me know in the comments!
Disclosure: Some of the links in this article may be affiliate links, which can provide compensation to me at no cost to you if you decide to purchase a paid plan. Thank you, if you do. As an Amazon Associate I earn from qualifying purchases. This site is not intended to provide financial advice and is for entertainment only. Read our affiliate disclosure in our privacy policy.
An excellent paint job definitely makes a big first impression, so we wanted to do it right. In this blog, I detail how to paint a skoolie exterior, including preparation and priming tips. I go step-by-step and describe how we created a smooth, durable finish by hand and what products we used for our budget.
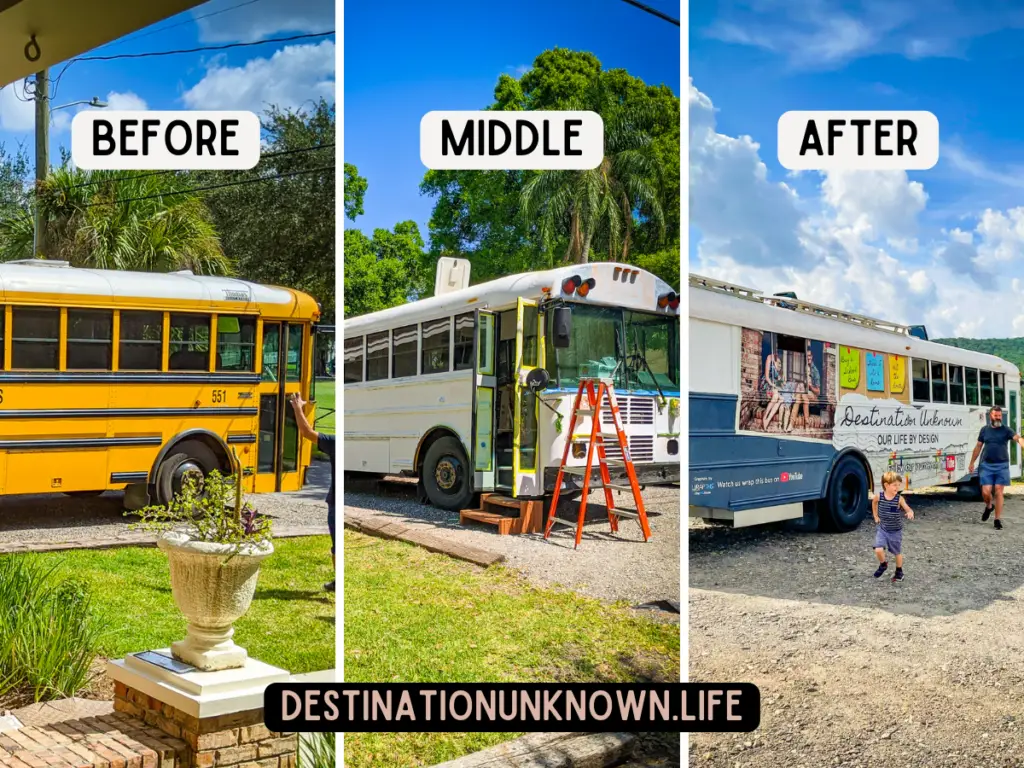
In 2021, I set to work prepping the exterior of our school bus conversion for priming and painting after weeks of researching the forums. It was a massive job for one person to accomplish (though I did have some helping hands along the way thanks to my husband and neighbor Joe).
I’m so happy it’s done and the end result is nice. Additionally, the products and preparation paid off because the finish is still intact today, even in hot Florida weather.
Are you going deep into the rabbit hole on skoolie paint? Check out these blogs.
Disclosure: Some of the links in this article may be affiliate links, which can provide compensation to me at no cost to you if you decide to purchase a paid plan. Thank you, if you do. As an Amazon Associate I earn from qualifying purchases. This site is not intended to provide financial advice and is for entertainment only. Read our affiliate disclosure in our privacy policy.
How to Paint a Skoolie Exterior
Skill Level Needed
I believe that this is a job that a beginner skill level can accomplish, though it does go faster with more experience.
At the time I did this job, I was a 34 years old and 6 months post-partum from my third child. I wore her on my back when I did some of the exterior work. If I can do it, anyone can.
Prepare the Skoolie Exterior Body for Primer and Paint
We have a 37-foot skoolie RV with an all-metal body and frame. Your paint supply and products will vary based on the body construction of your vehicle.
Remove and Delete Any Items that Won’t Remain on the Bus
Preparing the bus for primer is, by far, one of the most timely projects we took on during our bus conversion. We purchased our retired school bus directly from a school board in Tennessee, and we had to remove all the reflective tape and vinyl decals on the bus, flashers on top, and the extendable stop sign on the driver’s side of the bus.
We did not remove the flashers on our roof, since we took out the electrical that powered them.
If you’re planning to delete any windows in your rig, then complete this project before moving on to exterior prep for paint, unless you’re willing to touch up some areas after that work is done.
Remove the Vinyl Decals
To remove the vinyl decals, we purchased a rubber wheel on a drill bit that we attached to our drill. That made fast work of any vinyl decals and left a smooth finish. The rubber smelled slightly of vanilla, so it was one of the better smelling projects.
I recommend wearing a mask and protective eye gear during this process because the rubber shreds away into fine particles.
To remove the reflective tape, I used a heat gun and heavy duty scraper on the initial pass. Wear gloves because the melted tape gets very hot and sticky and the heat gun gets hot, of course.
The melted tape and its adhesive don’t smell great, so you may want to wear a mask too, especially if you’re working indoors.
Once the reflective tape has been removed, then you will want to remove any remaining adhesive. I found the best product was 100% pure acetone and a razor blade scraper. I recommend purchasing the acetone in a 1 gallon container that you can get from the paint section of your home improvement store, rather than the small containers you would find at the supermarket. You’re going to need a lot of the stuff. Goo Gone was not effective for me, even after letting it soak into the adhesive.
Once the thick chunks or goo balls are gone, then you can do a final pass with acetone. Your goal is to get rid of all the big sticky areas so you can sand the surface without gumming up the sanding pad.
Once all the adhesive residue is off the bus, go around the entire bus and do preventative treatment on the windows and seams, and any areas where holes have been cut. The goal here is to prevent water intrusion.
We removed all the old filler and caulk around the windows and replaced it with a new paintable product specific for automotive use. We added the same automotive caulk on the seams of the newly installed sheets of metal for the windows that we had deleted.
This wasn’t my favorite product because it dried very quickly and didn’t smooth the same way that a caulk would; however, it is a well-rated automotive product made for use on metal surfaces. It did sand down to a smoother finish. We had to special order this product from an automotive store since our local branch didn’t carry it in stock (during the pandemic).
Sand the Exterior
Next, we sanded the entire body of the bus. I primarily used a hand-held orbital sander with 80 to 120 grit sandpaper. In the hard-to-reach places, I would use a sanding block.
For the previously painted areas, the sanding goal was too lightly scuff up the existing body coat so when we applied primer, it would stick a little better.
If there were any areas of rust, we sanded and treated it with a Rust-Oleum product.
Treat the Body for Rust
On the areas where we had unpainted stainless steel, like where we had replaced or deleted windows, these metal sheets began to rust within days of installation. We lightly sanded the unpainted metal and sprayed a rust-preventative paint so the rust would not progress during the time it took me to prep the rest of the bus for paint.
On the areas of our bus that had been previously painted, like the body and rails, we did not experience any rusting in these areas.
Wash, Scrub, and Rinse a Few Times
Finally, we gave the bus a good bath and scrub with Evergreen cleaning solution. I highly recommend using a scrubby with an extendable pole so you don’t have to get up and down the ladder.
Rinse the bus a few times, especially the pockets around the window frames, to remove any dust and residue. You’ll want as clean of a surface as possible when you go to prime and paint the exterior of your rig.
Remove light fixture covers and tape off decorative elements
There is usually a cover or frame that trims out your headlamps, specifically. I recommend removing those completely since they come off with screws. For other fixed elements, tape those off and wrap with plastic.
How Long Does it Take to Prepare a Skoolie Exterior for Paint?
For a bus of our size, it took about 25 hours to prep the bus for exterior paint. The removal of the vinyl decal, reflective tape, and adhesive residue took 10 hours. Removing the old caulk and re-caulking the windows and deleted window sockets took about 5 hours. Sanding the bus took about 5 hours. Scrubbing and rinsing the bus took about 3 hours.
Paint the Skoolie Exterior Body
Now on to the fun part!
It’s worth noting that we worked in our driveway, out in the open. Our bus was not covered. As soon as we finished the wash of the exterior at the prep stage, we moved right on to the priming and painting.
Prime the Body
We primed our bus exterior with Rust-Oleum white metal primer that we purchased at our local hardware store. We also purchased a few spray cans of Rustoleum metal primer to help us do any quick touch-ups or hit those hard-to-reach spaces. We primed our bus with two coats on the treated metal, and three coats on the untreated metal.
We used a fine nap foam roller and foam brushes to apply the primer. These were recommended to us for smooth surfaces and metal finishes.
Paint the Body
We used a tintable oil-based enamel made by Valspar. We decided to use this enamel because it was recommended for the exterior, rust protection, all-weather, and metal surfaces.
How long does it take to paint a skoolie exterior?
It is reasonable to say that 65% of the time will be spent on exterior prep work before paint and 35% will be spent on painting. In total, we spent 40 hours to paint our 37 foot skoolie exterior. It took 25 hours to prep the body for paint (scraping, sanding, caulking, and cleaning) and 15 hours to prime and paint the bus exterior.
There are a lot of nooks and crannies that you have to cut in first, and then we did multiple coats of both primer and paint to reach our desired finish.
Skoolie Paint Supply List
Below is a list of supplies you’ll need to complete your skoolie exterior paint job. You can also find a detailed list of every product we put into our skoolie build in this blog.
Paint rollers
Foam naps (recommended nap for a smooth or metal surface)
Extension pole
Foam paint brushes (assorted sizes)
Painters tape
Cardboard
Painters paper
Dropcloth (optional)
Oil-based paint
Oil-based primer
Spraypaint metal primer
Elastomeric white paint (roof only)
How much exterior body paint did we use?
We purchased one 5-gallon container of Rustoleum white metal primer and one 5-gallon of tintable Valspar Anti-Rust Armor Enamel (oil base). We used about 4 gallons of each type of product on the body of our rig.
For details on what we purchased for our roof, read this blog.
How do I calculate how much paint I need for my Skoolie exterior?
We recommend using a paint calculator to determine how much primer and paint enamel you will need to paint your school bus conversion.
Sherwin Williams has a paint calculator and I’ve linked that below.
In total, we spent approximately $400 to paint our 37-foot skoolie exterior. We painted the exterior ourselves. One gallon of body paint costs about $45. We purchased a 5-gallon paint bucket and that cost about $170-$200. The primer cost about $11/quart, and we used 10 quarts. The spray paint cost about $6-9/can, and we used 3. We had the rolling supplies already but had to buy special naps and prep materials (tape, paper, etc), costing $100.
Paint Roll vs. Paint Spray a Skoolie Body
Many in the skoolie community choose to spray finish their exterior, and it would go a lot faster with a smoother finish, but it also requires more taping off and protection of the surrounding surfaces and buildings. I don’t know how to work a paint sprayer, but I can use a roller and brush, so this is what we did.
Conclusion
What products did you use on your rig? Let me know in the comments.